![[ Logo ]](../images/resqlogo.gif) |
|
| R | O | U | T | E | S |
WARNING! Rock Climbing is by its very nature, a potentially hazardous activity. The information presented here is intended as an adjunct to, not a replacement for, sound judgment and experience. The accuracy of the information presented cannot be guaranteed and may change with time. The onus is on the individual to verify the applicability of the information to a given time and environment before using it as the basis of any kind of decision. In addition, accurate knowledge of the use of various safety devices and systems is requisite to understanding the information presented and in determining it's applicability to your situations. Always use a backup to your systems where a failure could result in death or injury. Nature offers few second chances for poor or inappropriate application of information and techniques. The Law of Gravity has no Court of Appeal. This must not be your only source of information on any given climbing route or subject. Seek additional information from guidebooks, reputable climbing schools, mountain guides, local climbers, Park Wardens and Rangers. Common sense and a strong will to survive must pervade your thoughts and actions. By using the information contained here, you are releasing the authors and Rescue Dynamics from any liability for any injury, including death, that may occur. You have been warned.
Before you head out, check the Current Conditions Page for beta on what has been happening. Then check the weather on our constantly improving super weather page: Weather Forecasts for Canada - All on One Page.
| Morro Peak |
Last Updated June 19, 1998
The information presented is courtesy of Peter Amann and Cyril Shokoples, both IFMGA / ACMG guides in the Jasper area. The approach routes are identical except for the final sections getting to the base of each climb. The final sections through the upper trees, as well as the descent routes, are also identical. For that reason, it is worthwhile reading both descriptions as they describe these features slightly differently.
NWMC Mountaineers Route
5.7 / 275m on rock
FRA Tom Saunders, Cyril & Sandra Shokoples, An Other, c mid 1970s
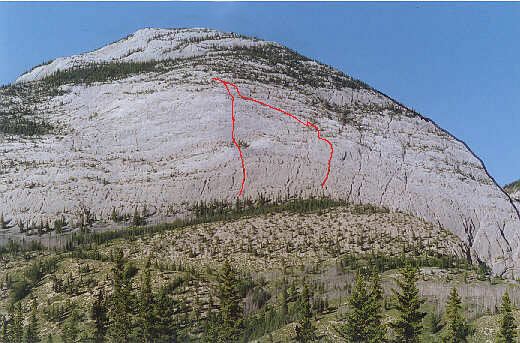
This is a new twist on an old route. The lower portion of this route was climbed long, long before the first "recorded" ascent, but the newer variant as described here is of better and more consistently solid quality. (This route is farther south or right in the photo of the two routes.) The approach takes about 40 to 50 minutes and average times from base to summit range from 2 to 4 hours. The descent typically takes about 30 to 60 minutes. Gear requirements on this route are modest and should include a half dozen or more draws or runners, a selection of medium wired nuts and some small to medium cams, plus slings for belays. The best car to summit time on this route is just under 59 minutes for a solo ascent and 1 hour 29 minutes all inclusive round trip time. The best known time for a team of two is about an hour and a half with just under 2 hours car to car.
Approach: Park as for the Overlander Trail or Morro Slabs. Hike along until below the SW face of Morro. When the Overlander Trail begins to descend down toward the river, look for a faint trail marked with a cairn heading up toward the face. Head up to the highest point of land below the face. Begin at the top of a scree cone next to a dead tree.
1. Climb up a short steep wall heading up and left on smooth downsloping holds past a piton in 3m. Continue up past two bolts in a wide water worn groove. Belay from 2 bolts just right of the start of a chimney / gully. (5.5+, 30m)
2. Climb easily up the gully then onto the right hand side past a fixed piton. At the third (and largest) small tree traverse right on a scree ledge to a 2 bolt belay. (5.0, 35m)
3. Climb up a 2m wall then scramble to the start of a crack feature at the base of a steeper solid grey wall. Belay from 2 pitons. (20m)
4. Climb the obvious crack weakness past a single piton to a small ledge on the right side of which is a single bolt and old piton anchor. (5.5, 40m) A fine variant is to begin up the crack then traverse right (still before the fixed piton) a short distance onto thin solid slab climbing. On the right side of an overlap gain a small crack which goes directly up to the same belay. (5.7r, 40m)
5. Traverse directly left from the belay, then mantle up to a ledge with a bolt. Climb straight up past an old piton then trend toward two bolts on a solid slab. Belay from a tree on a large scree covered ledge. (5.7, 30m) Two options present themselves at this point. To get more climbing and another great pitch (pitch 6), shortrope up and left for about 150m heading for the base of a roll of rock above the Guide’s Route. Alternatively, you can continue straight up, shortroping through trees and small cliff bands to gain the hiking trail just below the summit.
6. At the end of the long traverse, belay from trees. Climb straight up steep, sharp, water grooved rock to an old loose bolt. From the bolt you can go almost directly up (5.9 variant originally done on gear) or pull over a slightly overhanging wall on the right. Immediately after mantling over this section, traverse left to a two piton belay. (5.7, 20m) From here you can continue up for a little more climbing or traverse off to the left as most people do.
Hike and scramble up about 30m then generally work up and left trying to keep to an indistinct trail occasionally marked with cairns to gain the hiking trail to the summit. The descent is via the hiking trail which heads down in a northwesterly direction.
Guide's Route (Chimney) 5.7
FA Unknown
Your goal is to reach the SW face just to the climbers left of the highest area of trees. From the highway the line can be seen; a left leaning chimney and crack system leading up the face. It is split by an island of trees about 3 pitches up. Above the island again two more pitches of cracks can be seen. (This route is farther north or left in the photo of the two routes.)
Start for the Overlander trail head and head south for about 1.5km. Once the trail crest over a small knoll in the first km, it starts descending, at this point within 200m, look for a trail that branches left and up. Follow this trail which trends up and right. once you get closer to the face the main feature you are aiming for is a broad chimney, which starts one pitch up, and is about a pitch long. it is an obvious feature. Continue up the trail until you have passed the chimney, and you will find a short branch off the trail that leads back and left to the base of the climb. There are good trees at the base for a belay anchor.
1. From the tree belay go up an obvious gully 7m to the left. One pin up 5m, then a bolt about 15m up are found. From the bolt climb up and slightly left, 6m, sling a rock outcrop, then traverse right and up. The anchors (piton, bolt) are on a small ledge right of the chimney. (30m, 5.3, a bit loose)
2. Step up, head left and cross the chimney to the left side. Climb past two pins (5.5) about 15m, then step back towards the chimney where it gets easy. The climbing is on the left edge of the chimney now. climb up another 20m, past 2 pitons, and an old bolt, to a ledge with a bolt and a piton belay (piton hidden to the left). (35m, 5.6-5.7)
3. Climb up and break over a short wall 30 ft, to easier though loose terrain. Belay off the obvious tree. (25m, 5.3)
From here it is best to short rope up right, then left again to gain the treed ledge, that is the obvious feature on the route. This leads to the obvious crack system. A piton/bolt belay is on the left side.
4. Climb up on good rock, using a few mid sized stoppers. The belay is on the left again; piton/bolt. (45m, 5.5)
5. Continue up the crack system. Some old blocks of wood will be found stuffed in the crack. About 20m up, the route goes left to avoid a roof. It then goes straight up to a small ledge with a small old dead tree. Two old pins here for a belay. (5.5)
6. Though a little less obvious, the route continues up and trending slightly right, past a corner on your left, and staying in a water worn wall or groove. There are two or three fixed pins on this pitch. You are aiming for a small tree above you; there is a pin 5m below it. Climb past the tree onto a gravel ledge. A runner high on this tree makes a good directional, and keeps the rope out of the gravel. Head left for 10m to a block that can be slung for a belay. (5.3)
7. A few variations exist here. A beautiful wall above can be climbed. Alternately, about 30m to the right, a bolt can be seen which leads through a small bulge to a set of anchors. (5.7) As well, from pitch six, you can short rope up and left, onto a big ledge, then traverse right on exposed but clean rock exiting up onto another big ledge.
Descent: scramble up to gain the main trail, (there is a faint trail here, just follow the line of least resistance.) From here, either descend or first hike to the summit.
Rescue Dynamics
5109 - 17A Avenue NW
Edmonton, AB, Canada T6L 1K5
phone (780) 461-5040 voice / fax
Copyright © 1998 Cyril Shokoples
All rights reserved. Terms & Conditions apply.